Key Construction Technical Points of Mechanical Joint Fittings
Dec. 08, 2025
Mechanical joint fittings are core connecting components of large-diameter ductile iron pipe systems, featuring convenient installation and flexible disassembly. They are widely used in pipe network rush repairs, reducing diameter connections, branch connections, and other scenarios. Compared with socket and flange connections, mechanical joints do not require welding or hot melting and can be quickly assembled under complex working conditions. However, construction accuracy directly determines joint tightness and settlement resistance. The specific technical points and quality control measures are as follows:
I. Core Types and Adaptation Scenarios of Mechanical Joint Fittings
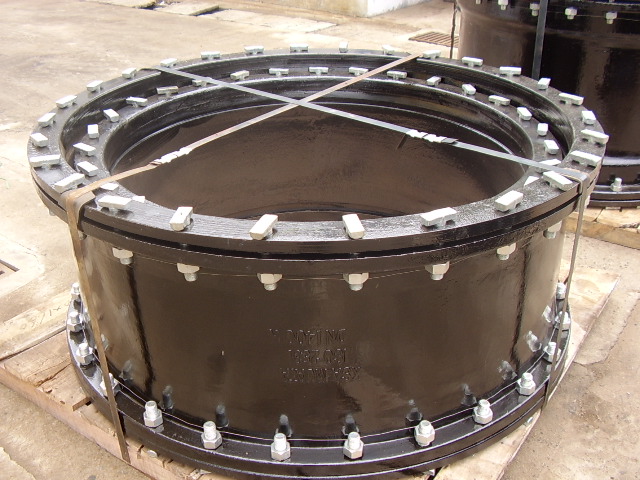
1. Rigid mechanical joints: Composed of a shell, a gland, a rubber sealing ring, bolts, and nuts. After connection, the pipeline has no axial displacement space. They are suitable for fixed parts such as pump station outlets and pipeline bends, and can withstand high pressure and impact force.
2. Flexible mechanical joints: Optimized the sealing ring structure based on rigid joints, allowing slight axial expansion, contraction, and angular deflection of the pipeline. They are suitable for pipeline connection in geologically soft areas and subsidence zones, and can effectively absorb the stress caused by foundation deformation and avoid interface leakage.
3. Special functional joints: Including reducing joints, tee joints, elbows, etc., used for pipe network diameter changing, branching, and steering. They must be accurately matched with the diameter and pressure rating of the main pipeline. It is strictly prohibited to mix joint fittings of different specifications.
II. Key Technical Points of Pre-construction Preparation
1. Inspection of fittings and pipes
・ Check the model and specification of mechanical joint fittings to ensure they are consistent with the nominal diameter and pressure rating of ductile iron pipes; inspect the joint shell and gland for cracks and deformation, ensure bolts and nuts are free from thread slipping and rust, and check that rubber sealing rings are free from damage, aging, and deformation. The sealing rings must be special accessories matched with the pipes.
・ Clean impurities, burrs, and anti-corrosion coating residues on the connecting end surface of the pipe, polish it smooth with sandpaper to ensure the sealing ring fits closely with the pipe surface without impurities affecting the sealing effect.
2. Preparation of construction tools: Equip with a torque wrench, level ruler, rubber hammer, and sealing ring installation tools. It is strictly prohibited to tighten bolts arbitrarily with ordinary wrenches to avoid excessive or insufficient torque; prepare an electric spark leak detector for integrity testing of the anti-corrosion coating after construction.
III. Key On-Site Installation Procedures and Quality Control
1. Sealing ring installation: Apply special lubricant evenly on the surface of the sealing ring and the connecting end of the pipe. Use a sealing ring installation tool to smoothly embed it into the joint sealing groove to ensure the sealing ring is free from distortion and edge turning and fits the groove wall completely; it is strictly prohibited to force installation by hand to prevent damage to the sealing ring.
2. Joint assembly and positioning: Sleeve the joint shell into one end of the pipe, align with the connection mark of the other end of the pipe, adjust the pipeline axis to ensure the concentricity deviation of the two pipes is ≤ 2mm and the pipeline levelness deviation is ≤ 3mm/m; gently tap the joint shell with a rubber hammer to make it fit closely with the pipe, avoid uneven stress on the sealing ring caused by pipe eccentricity.
3. Bolt tightening: Use a torque wrench to tighten bolts in a?diagonal cross sequence, gradually apply force to the designed torque value in 2-3 times, with uniform tightening amplitude each time, avoid deformation of the joint shell caused by excessive one-sided tightening; check the status of the sealing ring synchronously during the tightening process to ensure no extrusion or displacement.
4. Anti-corrosion treatment: After joint installation, repair the exposed parts of the joint and the damaged part of the anti-corrosion coating at the pipe connection end. Use the same anti-corrosion coating as the pipe, and the repair scope should cover more than 100mm beyond the joint edge to ensure no exposed metal surface; after repair, test with an electric spark leak detector, and no leakage point is qualified.
Previous: Common Troubleshooting of Pipe Fittings Accessories
Next: Loose flange pipe fittings vs. other flange pipe fittings: Comparison of applicable scenarios, costs, and installation difficulties